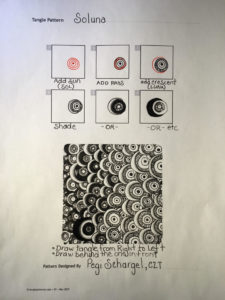
Soluna is a new tangle by me, Pegi Schargel, CZT. It consists of three easy strokes; orbs (circles), straight-ish lines, and a curved line (arc). Create Soluna in just three very easy steps. The inspiration for this new tangle is an outdoor light called Negron 1 that I saw in an online home improvement catalog. This shows that inspiration for tangle patterns can come from anywhere! Keep reading to see the exact steps…
The repetitive steps for this cute tangle are pretty straight forward.
Click on the step-out to see a larger, clear image of the Soluna steps.
Note for right-handed people: On the step-out, I show how to draw the tangles from right to left. I am very left-handed, and that is what is natural for me. I understand right-handed people aren’t as inclined to do likewise. Please draw them from left to right if that is what is more comfortable to you. Draw the tangles in a Hollibaugh fashion, tucking one ‘behind’ the one in front of it to add a sense of depth. Of course you can have more than one section of top-most Soluna tangles, just add them before you add the ones that you want to appear be behind just like you would if you were drawing the Printemps tangle.
1. Place a dot near either the left edge or right edge of the paper (or string section) that you want to work with, and add one or more concentric circles surrounding that dot. The astrological symbol for the sun (Sol) is a dot with an orb around it. Because Soluna tangle’s inspiration is a light, it also reminds me of the sun. Thus the first part of Soluna tangle name.
2. Choose one of the orbs to add straight-ish lines to represent solar rays. You can see these ‘rays’ in the outdoor light photo. To help keep my ‘rays’ straight, I sometimes like to add guide rays at eight points in the orb. I also turn my tile often so that I am drawing the rays toward my body.
3. Draw a crescent connected to the last orb. The photo of the outdoor light looks like part of the outer ring is like a crescent moon. A crescent is an astrological symbol for the moon (luna)… that’s why I selected luna for the second syllable in Soluna’s name.
When the tile or all sections are complete, shade as desired.
I have shown several examples of ways to draw and shade Soluna. The larger tile below the steps shows one way you might draw and shade a monotangle of Soluna. Repeat the tangle as desired, tucking it behind the one ‘in front’ of it.
That’s it for this easy to draw, fun and dynamic tangle!
Welcome to all my friends from tanglepatterns.com! If you like this post, be sure to checkout the rest of my blog and sign-up for my Zentangle Resource: Do More Art newsletter.
Like Soluna Tangle? Check out more Zentangle Resources
I have another tangle in my Zentangle Resource section of my website. B’Twined and is here.
